A brief bit of background on myself: I’m a civil engineer by education, project manager by profession, and a tinkerer at heart. By “tinkerer,” I do not mean itinerant tinsmith, but someone who is always looking for projects, whether that is improving (hopefully) something around the house or crawling under my Jeep XJ to replace another worn out part. [Editor’s Note: I met Doug and his family while galavanting around Europe in my diesel manual Chrysler Voyager. Here he is:
Note that anyone out there who’s a “maker” of cool, uncommon things (example: 3-D printed parts) is welcome to pitch to tips@theautopian.com. -DT] When the EV conversion bug hit me, I was living outside of Frankfurt, Germany, and had developed a bit of an addiction to rusty old bicycles, especially cheap, old Peugeots. At one point I could have considered the David Tracy of old Peugeots. I had 14 adult bikes at one point, so the logical first step on my EV conversion path was to convert one of them to an electric bike.
I Started With A Bicycle
Converting my bike turned out to be rather easy to do. I bought a Bafang BBS02 mid-drive motor kit and a 48V battery and installed everything onto a cheap 7-speed bike. I won’t go into detail on this; it gave me a dangerously quick bike to hoon around the Frankfurt area, which was fun (although not technically legal), but it didn’t really scratch my EV conversion itch.
European Regulations Made My EV Plans Harder Than They Needed To Be
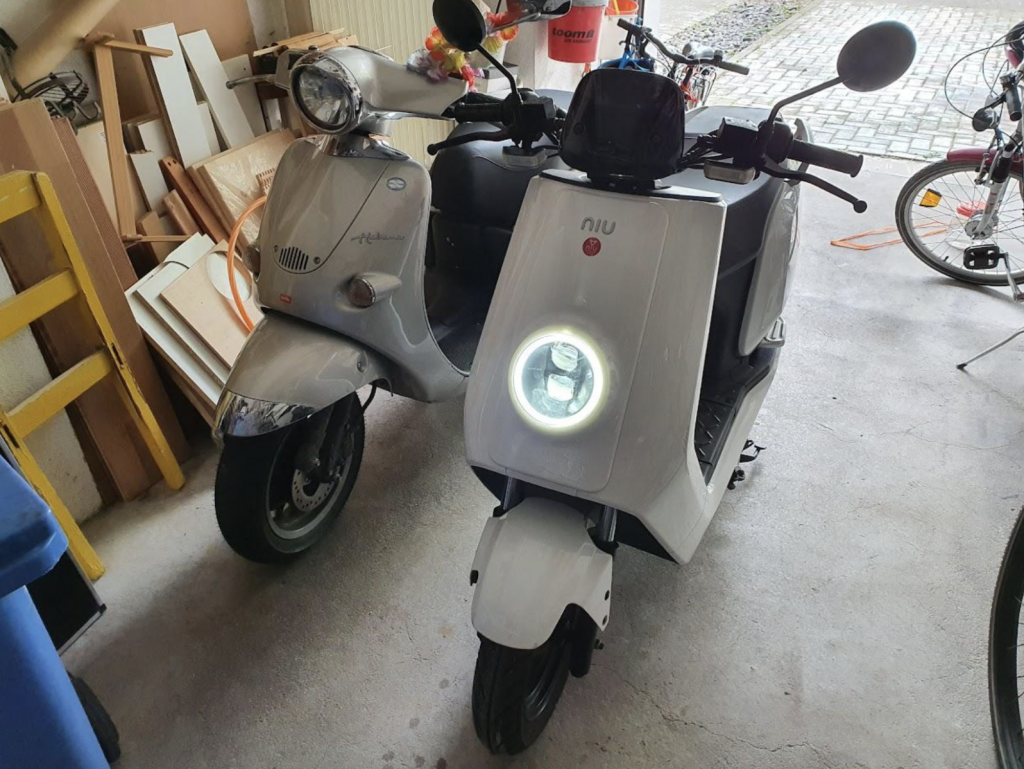
As luck would have it, I ended up with my first moped courtesy of a colleague of mine. This was a 1999 Aprilia Habana 50 (aka Mojito 50 — see bike on the left above) that had been sitting in a garage for several years being consumed by mice. When I brought it home for restoration, I started looking into how I could convert it to an EV. That’s when discovered that this is stupidly expensive to do in Germany. The German authorities aren’t too keen on people undertaking EV conversions, so they make it difficult and expensive to get the converted vehicles properly registered and inspected by TÜV. The prospect of investing money into the conversion and then shelling out a few thousand extra Euros to legalize it put me off the idea of converting the Aprilia, and in the end I just focused on getting it running and giving it a cosmetic makeover. In spring 2020, about a month into the pandemic, I decided to pick up a second hand 2017 NIU N1S (shown above on the right). These electric mopeds were popular with ride sharing companies, including Revel in New York City and Frank-E in Frankfurt. I had tried one of the Frank-E sharing mopeds and was instantly addicted to the torque and relative silence compared to my 50cc Aprilia. In August 2021, my family and I moved from Frankfurt to London. I managed to whittle down my bike fleet to a handful and sold my Aprilia to a colleague, but I decided to keep the NIU and move it over as a “household item.” In hindsight, this was a stupid decision, as, in order to register an imported motorbike in the UK, you need to have a speedometer than can display MPH. The NIU has a digital speedometer that was set to KPH. I naively thought: “No problem, I will just have this switched somehow.” Problem 1: the permanently mounted SIM card within the NIU ECU was dead and not connecting to the mothership in China. Problem 2: my 2017 N1S was a first-generation model that was never sold in the UK. To make a very long story short (too late), despite a very helpful local NIU dealer and a few hundred pounds spent on a new ECU and display, I was not able to get the speedometer to display in MPH. Around the same time, my battery died, so I pulled the plug on the NIU, stripped it down, and listed all of the parts on eBay. [Update: I am now using the powertrain from the NIU to convert a Vespa LX 50.]
Vespa PX125: My EV Conversion Project
A month or two later, I decided to give myself an early Christmas present and bought a 2008 Vespa PX125. This time, I had done my research and I knew with 100 percent certainty that I could not only convert it to an EV but also register it without too much hassle in the U.K. The Vespa PX range was built from 1977 through 2017, with an emissions-linked hiatus from 2008 to 2011. There were a few different displacements on offer, but the most common was the 125cc version. The PX has the classic steel body, a 4-speed manual transmission, and a 9 horsepower 2-stroke engine good for 56 MPH (90 KPH). My PX125 (or P125X) is a 30th anniversary model and was already exempt from London’s Ultra Low Emission Zone (ULEZ) charge. Technically, only motorbikes with a Euro 3 emissions classification and higher are exempt, but some Euro 2 models, like my PX, were also exempt due to low NOx emissions. The fact that it was exempt was one of the reasons I bought it. While I live outside of London’s dreaded ULEZ, I do need to drive inside it when I ride to my office. Had it not been exempt, I would have had the privilege of paying £12.50 (~$15 USD) per day each time I rode to work. My conversion plan was relatively simple: buy a kit from Retrospective Scooters and convert it in my tiny garage. Retrospective Scooters is a company in North London that specializes in classic Vespas and Lambrettas, but also sells a few modern brands as well. I had come across the kits when researching EV conversions a few years ago, and had subsequently read about them on a few sites, including in the New York Times. So shortly after buying my Vespa, I placed an order for my own EV conversion kit. The kit consists of a 3-kW hub motor, custom swing arm, controller, wiring, 64V battery, LED bulbs, and other miscellaneous components. In theory, I wouldn’t need to purchase any other parts as this had everything I needed.
I placed the order just before Christmas and was advised that there was roughly a 3-month lead time as each kit was made to order. This turned out to be a pessimistic estimate because it was ready for me to pick up only six weeks later. I drove over and picked up the kit in person, which gave me a chance to meet Niall and see a lot of amazing vintage scooters. It also gave me a chance to ask a few questions about the process and to see exactly how the components fit together. I brought the (rather heavy) box home, stuck it in my tiny garage, and began to wonder how I would manage the logistics of the conversion process.
Out With The Old
The first challenge was finding the time to get started. In addition to having a full-time job, I have three kids (aged 1 to 12), so getting permission to disappear into the garage for an afternoon (let alone an entire weekend) is no easy task. After some groveling and several promises, I was finally able to sneak off to the garage to start stripping. Having never turned a wrench on a Vespa before, I prepared to scour YouTube for help on how to complete the first step of Retrospective Scooters instructions, which starts with “Remove the old engine.” Fortunately, I didn’t need to look further than the Retrospective Scooters YouTube channel, which includes a video of removing an engine from a PX125. In the video, Niall does it in roughly four minutes. I didn’t quite manage to do it that quickly, but it wasn’t that difficult. It was at this time, I decided to document the entire process on video and to upload it to my own fledgling YouTube channel. I am not trying to become the next YouTube amateur mechanic superstar; my goal is to upload videos of things that I hope will be helpful to others. I have relied heavily on YouTube videos for my own projects, so I wanted to reciprocate. As shown above, I started by removing the mirrors, windshield, and side panels, and then taping on some foam to protect the sides. As I do not have a proper motorbike workbench, removing the engine was going to involve tipping my Vespa over on its side. I then siphoned the fuel out of the tank and ran the engine until it died.
The full text of the first step from the instruction manual is: “Remove the old engine and ALL old cables and electric wiring harness including light switch and brake switch (front brake and speedo cables remain).” This made it relatively easy as I could just cut wires and cables and not have to worry about reusing them. I removed the airbox, carb cover, disconnected all of the wires and hoses, and then removed the spare tire and battery. I then grabbed a 22mm socket wrench and my crescent wrench and prepared for the worst as I tackled the engine bolt.
To my surprise, my breaker bar was not required as the nut came free without too much drama. I loosened until the nut was just beyond the end of the bolt, and then gave the nut a good whack with my hammer, thus loosening the long bolt enough so that it could eventually be extracted from the other side. I then loosened the lower rear suspension bolt and laid the Vespa over on its side. After cutting the rear brake, clutch, and gear selector cables, I used my Visegrips to extract the engine bolt and rear suspension bolt. Again, this was surprisingly easy, certainly much easier than wrenching on my crusty Jeep. The fuel line was then cut, and I was able to pull the engine assembly free.
When I picked up my kit at Retrospective Scooters, Niall agreed to buy my old engine, so a few days after I removed it, a “man with a van” service came and picked it up. I also threw in the old fuel tank, which was also easy to remove. Removing all of the existing wiring was next on my list. Had I bought a kit a few months after I did, removing all of the wiring would not have been necessary. The first iteration of this kit included a controller that could not be grounded on the chassis. This meant that I had to remove all of the wiring and replace it with a new harness that did not connect to the chassis. The latest kits from Retrospective Scooters use a different controller that can use a chassis ground, so it is now more of a plug-and-play kit. While my kit was therefore a lot more labor intensive, at least I know exactly where each wire goes and what it does.
After removing the rear taillight and wiring, I moved up front and dissembled the handlebar area, including removing the light, gauge cluster, and horncast. There was quite a bit to disconnect and pull, but eventually everything that needed to be removed had been removed. I then wiped down the Vespa and removed as much grime and grease as I could before continuing with the fun part.
In With The New
I started out with the small bits that should have been simple. I installed a new horn in the horncast. The second was also fairly simple, which was locking the gear selection function on the lefthand side of the handlebar and tightening the clutch lever. On manual mopeds, you change gears by rotating the lefthand grip. The entire grip and clutch lever rotate as one. Since my EV does not have gears, I needed to stop it from rotating. To do this, I drilled down through a sleeve through which the grip/clutch assembly rotates and into the shaft. I then screwed down through the sleeve and into the shaft.
The next step that should have been simple was not: installing an LED bulb into the headlight assembly. The bulb should have dropped into the housing, but the diameter of the bulb was bigger than the opening.
The headlight housing is just plastic, so I used the grinding bit on my Dremel to enlarge the opening until the bulb dropped in. This wasn’t too difficult, but it took precious time and created a mess. Despite my best attempts with my shop vac, there is still some plastic dust in the housing today, which is annoying. The taillight LED installation was uneventful, and I moved on to the rear brake. Removing the rear brake was easy enough, but removing the old rear brake cable and housing was not. The rear brake cable is held in place with a pin, which in turn is held in place by a cotter pin. This cotter pin was the biggest pain to remove. No matter how straight I got the legs of the cotter pin, I could not pull it through the hole. I lost track of how long I spent trying to get it out. In the end, I used my wire cutters to basically destroy it, but at least I was finally able to continue. I had hoped to reuse it, but this was now impossible. Luckily, I was able to pick up a new one for free from a local scooter and motorcycle store. After installing the new brake cable, I replaced the brake light switch with the new one from the EV kit and then set it aside.
The new hub motor and controller assembly were the big-ticket items to be installed. It was at this point that I should have called a friend or asked my wife or one of my kids to lend a hand, but I foolishly forged ahead alone. With the frame precariously balanced on a sewing machine box and the spare tire, I attempted to ease the hub motor and swingarm into place. After nearly causing the Vespa to topple several times, I came to the conclusion that I needed to create about two millimeters of additional clearance. I broke out my Dremel again and ground away on the swingarm bushing sleeve. This helped a bit, and some carefully places hammer blows on the inside face of the Vespa’s swingarm mounting points did the rest. With the swingarm in position, I was able to slide the engine bolt through and loosely tighten the nut. The rear suspension was then bolted to the hub motor assembly and I was able to gently set the Vespa back down on the rear wheel.
As you can see in the above photo, the controller is sitting on the ground, attached the hub motor with a thick cable. The controller and hub motor come from Retrospective Scooters already connected to each other, so after motoring the hub motor, you need to mount the controller. On my PX, the controller bolts into the existing spare tire mounting bracket. This was a tight fit, but otherwise uneventful. With the main components installed, I now tackled the part I had been looking forward to the least: the wiring. I am comfortable with wiring in general, but I was not looking forward to routing everything through the small openings, especially in the handlebar area. The high voltage wiring was the easy bit as everything fit through the existing rubber grommets without requiring too much persuasion. The 12V wiring was a different matter.
The instructions from Retrospective Scooters included a 12V wiring diagram with all the main components, but there were a few things missing: the indicators (turn signals), the rear brake light switch, and the gauge cluster lights. The front indicators were not that difficult to solve. The back of the indicators are easily accessible from the glove box and I could see where the wires went through the body to the area under the horncast. The indicators need to be disconnected from the chassis ground, which was easy enough to do, and I managed to connect everything up to the switch near the handlebar. The rear indicators were more difficult. The indicators are mounted on the removable side panels. The way the indicators are “wired” is actually quite novel: they use the front mounting pins to transmit the 12V power. So when you remove the front panels, you don’t need to disconnect any electrical connections. Since my kit does not use chassis ground, however, I needed to find another solution. This initially involved modifying the indicators themselves. While the side panels are metal, the housings are plastic, and there is a wide metal strip connecting the bulb socket to the metal panel. I was able to clip this with my wire cutters and trim it so it fit a standard spade connector. I then drilled a hole through the corner of the housing and routed my new ground cable through the hole and connected it to the bulb socket strap. On the other side of the panel, I soldered a new wire onto the positive wire from the back of the socket and eventually terminated both ground and positive wires with male spade connectors. On the Vespa side, I ran new indicator wires from the handlebar switch down to each side and terminated them with female spade connectors. This would allow me to connect the indicators when I installed the side panels. I eventually replaced these with waterproof connectors that are less fiddly than the spade connectors, but the spade connectors worked without issue for the first couple of months. The rear brake light connection that was missing from the 12V diagram wasn’t that difficult to solve. I was able to run new wires down to the rear brake pedal assembly, which I now finally installed. I used the old 12V battery through the process to make sure that the lights worked properly before buttoning everything up. The gauge cluster wiring was less straightforward. Again, if I were to buy a kit today, it would just be plug-and-play, but that was not the case with my kit and my Vespa. While the fuel light was no longer relevant, I wasn’t to make sure that the low and high beam lights were working, as well as the “dummy” light for the indicators. I searched through the maintenance manual for my Vespa and found the wiring diagram that included the gauge cluster. I then created my own wiring diagram that shows the connections to my new wiring harness.
The Zener diodes I added were to ensure that current could only flow one way from the indicator switches to the indicator “dummy” light. Without them, current could flow from the left to the right or vice versa, meaning left and right indicator bulbs would always come on at the same time. In theory, this should have worked, but it never did, and to this day the dummy light does not work. I haven’t bothered trying to solve this, mainly because I don’t want to deal with the wiring if I don’t have to, and I am fine to live with this one fault.
The rest of the wiring went according to plan. This included mounting the new battery gauge and connecting it to the controller. I decided to mount it on the flat surface of the glove box top, which allows me to glance down at it while stopped at a traffic light to make sure that all is in order. I mounted the gauge using a hole saw and then enlarging the opening gradually until the gauge fit.
The gauge itself required a bit of programming as it was set up for a 72V battery and I needed it set for a 64V unit. With the gauge in 72V mode, a fully charged 64V battery showed as being at 50% charge, which was obviously incorrect. Unfortunately, there were no instructions included, so this required a bit of internet sleuthing and, ultimately, translation. I was able to find the same gauges for sale on a Korean website that, luckily for me, included instructions as a PDF. Google Translate was able to do a pretty good job of translating the Korean into English, with the normal humorous errors. Still, it was a good enough translation for me to properly program the gauge. I eventually sent the English version of the instructions (edited by me to make sense) to Retrospective Scooters for them to send to any other customers with the same problem. With the wiring more or less complete, I fished the new throttle cable through the Vespa from the handlebars through to the controller assembly. The photo below of the top of the controller shows the 12V junction box of the left, the (yellow) high voltage connections in the middle, and the electronic throttle on the right.
I could finally install the battery. The kit includes a metal bracket that wedges into the opening under the seat. This allows just enough room for the battery to be placed into the opening and connected to the cables. Admittedly, I did need to break out the hammer and do a bit of work on the (somewhat sharp) lip around the opening in order for the battery to fit more easily.
With the battery finally installed, I was able to turn it on for the first time to check that the 12V wiring was working properly. Other than the aforementioned dummy light issue, everything was working.
The final step was to connect the new rear brake cable to the rear drum brake. This was also relatively straightforward, although I admittedly discovered later that I needed more of an arc on the cable as the rather acute angle was causing the brake cable to stick a bit.
My First Ride
After putting everything back together again, I wheeled my electric Vespa out of the garage for the first time and hopped on for a ride. Having ridden my NIU for over a year in Germany, I knew what to expect from an electric moped. There’s no loud engine or constant 2-stroke vibrations, it’s just smooth and quiet ride. Compared to how my Vespa used to perform, I can say without a doubt that this is definitely quicker off the line. The torque delivery of EVs is well known, so that observation is not exactly earth shattering. Beyond 40-45 MPH though, my old petrol/gasoline engine clearly outperformed the electric motor. However, given that my commute mostly involves 20 and 30 MPH speed limits with only a couple of brief stretches of 40 mph road, the reduced top end performance it not an issue. And as anyone who drives around London knows, there are cameras everywhere, so most people obey the speed limits. Compared to my NIU N1S, my Vespa feels quicker. My NIU was a 50cc class moped, so it was limited to 30 MPH anyway, but off the line it was still quick. The top speed on my Vespa is roughly 55 MPH, so it would obviously leave my N1S in the dust. Another differentiator between my Vespa and NIU is the overall feel. My NIU mostly consisted of plastic body panels on a steel frame. It felt lighter than the Vespa, but not in a good way. It had a cheap feeling to it and felt a bit fragile. My Vespa, with its steel body and minimal use of plastic, feels solid and robust. It gives you more confidence when riding and feels more predictable. And from an aesthetic point of view, I love the fact that it’s somewhat of a “stealth” EV. It looks like a normal Vespa PX125; it’s not until you look closer that you notice the lack of exhaust pipe that one suspects that something is different.
Several Months Later
I’ve been riding my electric Vespa for several months now and I love it. That being said, I did decide to upgrade it a bit. The range with one 64V battery is stated to be 30 miles of “real world” riding. My commute to my office is roughly 15 miles, so this estimate seems about right. At my office, I would charge the battery near my desk, which would normally take 90 minutes or so. This was fine, but I did run into one problem: tapering. As the battery depletes, the software in the controller takes steps to protect the battery. On my ride home, the second to last mile is a 40 MPH road. With my battery getting down to 60% the controller would limit the power, meaning that I would struggle to reach 40 MPH, let alone maintain the speed on the slight uphill stretch. Eventually, I decided to take the plunge and buy a second battery.
The second battery mounts on a custom bracket in the area where the engine used to be. Retrospective Scooters had these in stock, so I decided to ride over there during my lunch break to pick up the battery and the bracket. To save me the hassle, I had Niall’s mechanics install the bracket for me; I completed the installation at home by connecting the additional cabling. With the two batteries, my range has unsurprisingly doubled. More importantly, I no longer have range or performance anxiety on my commute. It is slightly annoying to have to carry two 20-lb batteries to and from my desk at the office, but charging for free is a nice perk. My office recently installed a few level 2 chargers for motorcycles, but outside of a Livewire or Zero (which I have never seen in London), I can’t think of any electric moped or motorcycle that uses them, so I doubt that these have seen much use. One other important thing that I took care of in the last few months was getting it officially registered as an electric vehicle. This was a somewhat lengthy process, but amazingly cost me nothing. Retrospective Scooters was super helpful throughout the conversion process, and they were essential here as well. Without getting too much into the UK-specific terminology, I sent to the Driver and Vehicle Licensing Agency (DVLA) my existing vehicle registration and a cover letter from Retrospective Scooters that explained the EV conversion process and components. A month or so later, they sent a reply directly to Retrospective Scooters asking for additional information. They responded, and eventually the DVLA contacted me to arrange for one of their inspectors to come to my house to verify that my Vespa had actually been converted. A few weeks later, an inspector came to my house, had me remove the side panels, took a few photos, and noted down the VIN. A week or two after that, my Vespa was officially registered as an EV. Going through the paperwork process was important to me for a few reasons. Number one, I needed to make sure that my insurance was up to date in case of an accident or theft. Second, with my Vespa officially registered as an EV in the UK, I can now theoretically export it to Germany or any other EU country and they would register it as an EV without question. And third, while my Vespa was already ULEZ exempt, I wanted to future proof it in case the emissions standards are raised a few years down the road. Now it is permanently exempt from ULEZ charges and I don’t have to pay the £21 annual road tax.
It Was Worth It
Was this worth the effort and expense? To me, yes, no question. True, I could have bought a new NIU, Super Soco, or several other electric scooters for half of what I spent. I could have even bought a new electric Vespa from Piaggio for roughly the same price. But buying any of those would not have given me what I was craving: a project. My itch has been (for now) scratched. I have the satisfaction that I built my own electric Vespa. I know exactly how everything works and have the confidence that I could deal with any issues that crop up in the future. Riding it always brings a smile to my face, especially when I do full “throttle” launches when the lights turn green. Now on to the next project, which might end up being an EV conversion of my Jeep . . . I went to school wanting to design/build EVs or their components. Because I had student loans to pay off when I graduated, I had to settle for working for the utility industry. Now, that’s all anyone wants me for. In 2002, I was probably the only kid in my entire city who knew how Alan Cocconi’s AC inverter design worked, or what a Solectria Sunrise was. I spent many hours reading SAE publications, gained a lot of theoretical knowledge, and had nothing to apply it on and no resources with which to apply it. To say it was frustrating would be an understatement. The EV industry took off without me contributing to it, in spite of that being the whole point of me going into electrical engineering. Sucks, but that’s how it goes when you lack the money to do things. I could have dropped out of high school and sold crack instead. It would have allowed me the money to actually build something, back when it would have mattered and someone who could have used my capabilities would have cared. But I must say, TWO 20-lb batteries only yielding a 30 mile range at 20-30 mph? That sounds awfully inefficient. By your description of its batteries and range, this Vespa seems almost as energy-thirsty as my electric Triumph GT6 that easily weighs an order of magnitude more. Aero matters. A converted GT6 can hold 60 mph on around 0.10 kWh/mile if you tweak the aerodynamics, as that is what Reverend Gadget did with his GT6-bodied Triumph Spitfire conversion. But I see even that as piggish, even though that’s about half the consumption of a Tesla Model 3 in the same conditions. Here’s why. A custom one-seater vehicle I built, shown in my profile, uses an 18 pound 1.5 kWh Lithium Ion battery. I get a 150-200 mile range at 30-35 mph cruising speeds with light pedaling when not hooning it about. That is 0.008-0.010 kWh/mile at 30-35 mph. I pay about $0.10/kWh. Tires/innertubes are an order of magnitude more in cost per mile than the electricity I power it with, the cost of tires/tubes being roughly $0.01/mile. Chain is the next most expensive component of its operating cost, at $0.004/mile. I have almost 70,000 miles on this vehicle, and it cost a bit under $3,000 to build. Overall cost per mile is cheaper including the cost to build this vehicle from scratch has been about $0.06/mile, and that gets cheaper the more I use the vehicle. This is less expensive than taking the bus or light rail, but I get most of the convenience of a car. Whenever the police pull me over(and it happens frequently), it’s a “bicycle” and there’s nothing they can do. In my state of residence, it is not defined by any of the motor vehicle codes and it is perfectly functional as a bicycle. In states where it is illegal due to ebikes being defined, I have a switch to limit it to 28 mph/750W to make it into a “Class 3 ebike”, but when I’m out in the country and no one is looking, I can turn that switch off. Weighing only 91 lbs, the vehicle is perfectly pedalable with the motor disabled. Using nothing but my own legs to power it, I can cruise around 25 mph on flat ground and sprint to 35 mph if the battery runs dead or I shut the motor off. It’s perfectly functional as a “bicycle”. But that’s not all. When hooning it about, it peels out, does donuts, and can reach about 50 mph depending upon battery state of charge. All on a grand total of 4 horsepower, using only about 1 horsepower plus vigorous full-effort pedaling at top speed(due to the BEMF of the motor building up and not having a high enough battery pack voltage to generate the power at the rpm 50 mph is reached at). It’s being upgraded to handle 100 mph, already has the new motor installed wound for more rpm per volt, and will have light-duty motorcycle rims, solar car tires, a roll cage, and other changes, with the ultimate goal of it being able to perform like a car with the motor in use, but still being pedalable at faster-than-bicycle speeds with the motor disabled due to its aerodynamics. The next body is going to be so slippery to the air that with the motor shut off, I might be able to sprint to 45 mph. It will have 13 horsepower using the motor when I get done with it, which will be enough to accelerate like a modern car, if not slightly faster than the average new car should I get sufficient traction on the drive wheel, and if it tops out at 100 mph, I might only need 4 horsepower to hold that speed. I plan to kep the finished vehicle under 100 lbs. I REALLY want to design a sports car off of this idea, with no bicycle drivetrain at all. Just designed for pure hoonage, with hundreds of horsepower, weighing under 200 lbs, and being so slippery to the air that the drag force becomes mere noise and fails to impact acceleration. Could you imagine 0-60 mph in under 2 seconds, and 0-120 mph in under 5 seconds? Nice project man!! Let us know if you Get the dummy light working! If your performance requirements are modest, you could build a 35-40 mph capable conversion with a 20-30 mile range for well under $2,000, if you’re patient enough to scrounge for used parts. Golf cart parts will work in an EV conversion. Some people have gotten conversions to the spec I describe for as little as $500. Lots of sweat equity will be invested though. How did that e-bike kit hold up long term? I’ve been considering converting my Marin hybrid bike to an e-bike, but I find the hole world of conversions very confusing. It doesn’t help that I know very little about bicycles. Although regarding CO2, it’s no contest. The scooter will be greener on that measure by far.